들어가기 앞서...
영상을 재생할 수 있는 프로그램을 만들것이다.
1. 주의 깊게 봐야하는 점...
- video_player 플러그인
- image_picker 플러그인
- Stack 위젯
- AspectRatio 위젯
2. 간단한 설명으로는...
image_picker 핸드폰에 있는 비디오선택 후 video_player 비디오 재생
Stack 화면을 제작하고, AspectRatio 은 비율대로 childWidget 을 조절할것이다.
본문으로...
1. 기본 세팅 !
- 페이지 세팅 및 asset 폴더 경로 설정
1) 로고와 비디오 3개 정도 준비하자!
2) 페이지 세팅 및 asset 폴더 경로 설정해주자!
로고 파일은 assets 경로 설정을 해주고, 비디오 같은 경우 다르게 설정을 해줄것이다.
// pubsepc.yaml
flutter :
	assets:
    	- asset/image/
3) add Dependencies
https://pub.dev/packages/video_player/versions
video_player package - All Versions
Pub is the package manager for the Dart programming language, containing reusable libraries & packages for Flutter and general Dart programs.
pub.dev
https://pub.dev/packages/image_picker
image_picker | Flutter Package
Flutter plugin for selecting images from the Android and iOS image library, and taking new pictures with the camera.
pub.dev
4) permission 을 해줘야한다.
video_player 는 permission 이 중요하지 않다. 왜냐 저장된 비디오를 사용할것 이기 때문이다.
만약에, 네트워크를 통해서 영상을 스트리밍 한다면, android ios https 링크가 아닌 , http 링크로 webview 권한 설정을 따로 해줘야한다.
image_picker 는 필요하다.
<key>NSPhotoLibraryUsageDescription</key>
<string>사진첩 권한을 허가해주세요.</string>
<key>NSCameraUsageDescription</key>
<key>카메라 권한을 허가해주세요.</key>
<key>NSMicrophoneUsageDescription</key>
<string>마이크 권한을 허가해주세요.</string>
2. 홈스크린 제작
만약 이미지가 출력이 안될때는 https://hitang.tistory.com/154 방문!
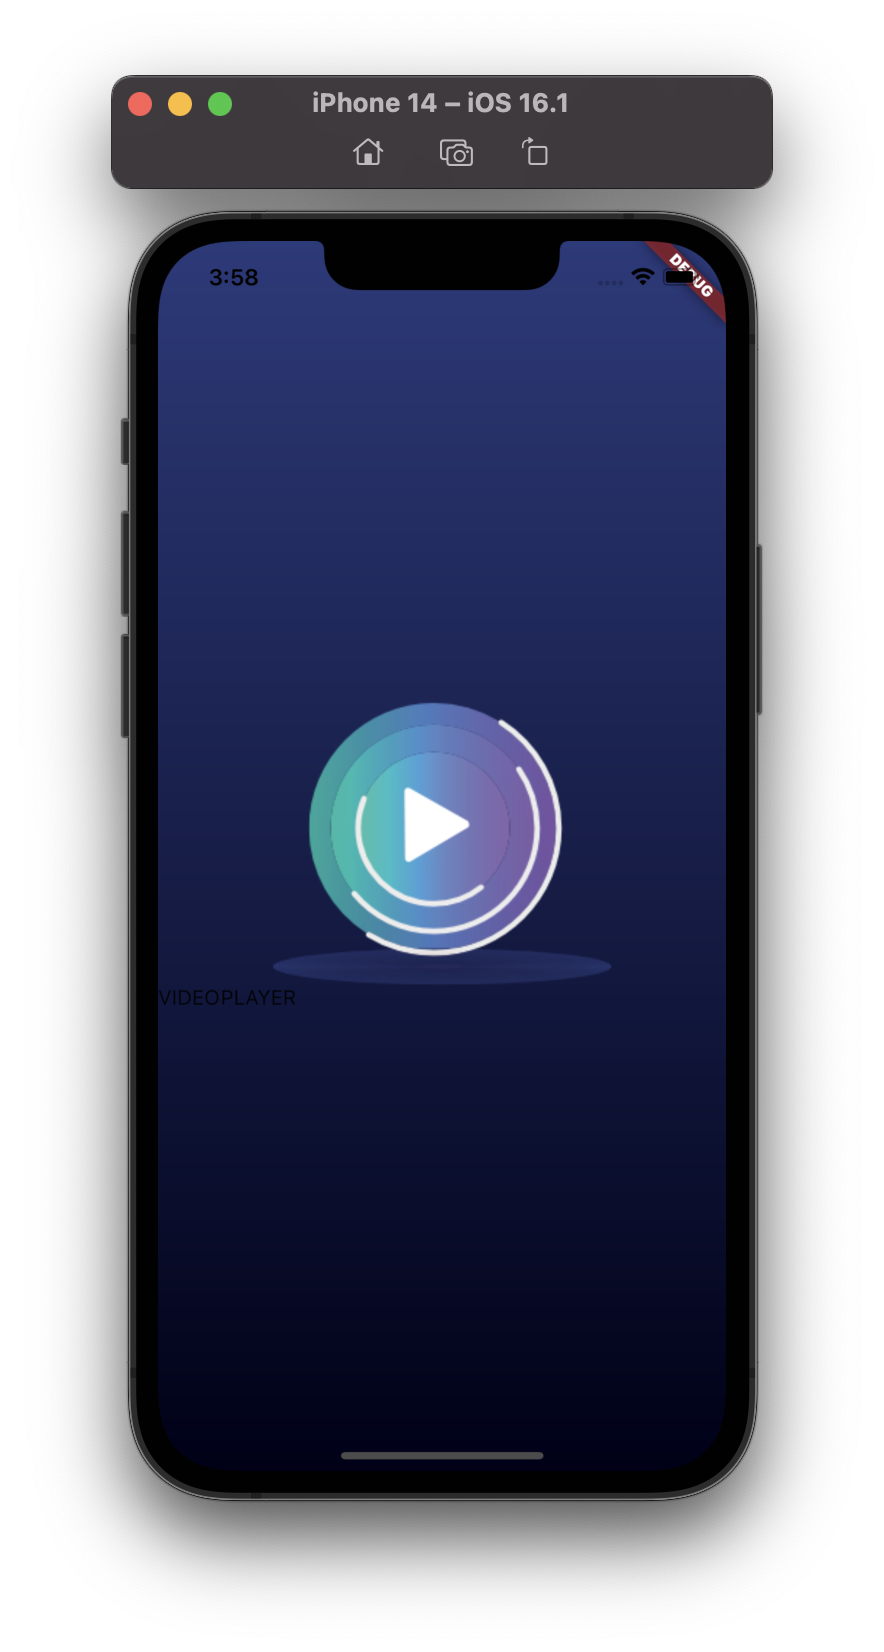
Scaffold(
        body: Container(
      width: MediaQuery.of(context).size.width,
      // 색상만 추가하는 경우가 많으니 평소에 이렇게 사용했다.
      color: Colors.black,
      // 하지만 정석은 BoxDecotaion(color: Colors.yellow)
      decoration: BoxDecoration(),
      child: Column(
        mainAxisAlignment: MainAxisAlignment.center,
        children: [
          Image(
            image: AssetImage("asset/img/logo.png"),
          ),
          Row(
            children: [Text('VIDEO'), Text('PLAYER')],
          )
        ],
      ),
    ));
1) decoration : BoxDecoration() 위젯!
정석은 BoxDecoration 안의 color 파라미터에 배경색을 넣어주는것이다.
그런데, 색깔만 넣는 경우가 많으니, color 파라미터만 사용한것이다.
그렇기 때문에 decoration 파라미터를 사용하면 color 파라미터를 빼줘야한다. 아니면 에러가 난다.
에러
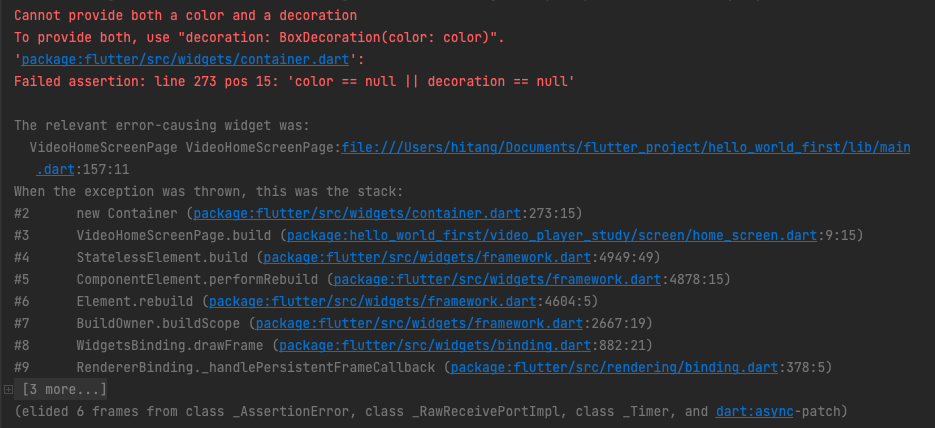
// LinearGradient : 어느시작 부터 어느끝까지 일괄적으로 점차 색이 바뀐다.
// RadialGradient : 가운데서 부터 동그랗게 퍼진다.
decoration: BoxDecoration(gradient: LinearGradient(
	// 시작
	begin: Alignment.topCenter
    // 끝
    end: Alignment.bottomCenter,
    // 색
    colors:[
    	Color(0xFF2A3A7C),
        Color(0xFF000118),
    ]
)),
2) 나머지 UI!
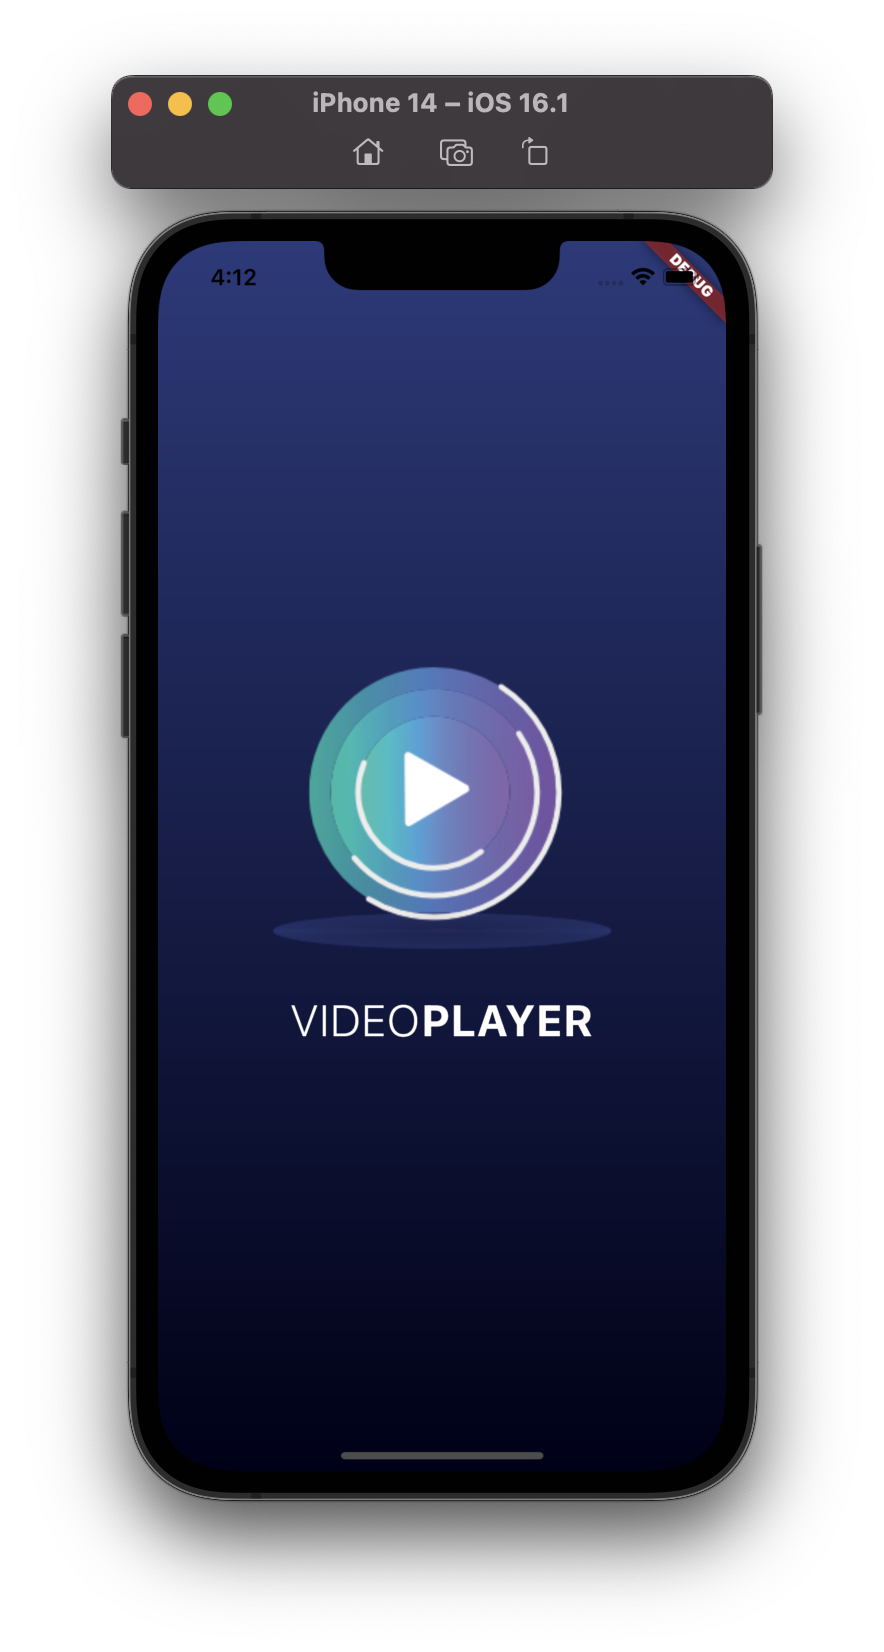
...
// 공통적인 textStyle 변수 선언
final textStyle = TextStyle(
  color: Colors.white,
  fontSize: 30.0,
  fontWeight: FontWeight.w300,
);

...
SizedBox(height: 30.0),
Row(
    mainAxisAlignment: MainAxisAlignment.center,
    children: [
      Text(
        'VIDEO',
        style: textStyle,
      ),
      Text(
        'PLAYER',
        style: textStyle.copyWith(fontWeight: FontWeight.w700),
      )
    ],
  )
 ...
SizedBox 와 Padding 중 여기서는 SizedBox 를 써주자!
Padding() 위젯을 사용하면 child 하고 자식으로 하나 더 늘어나기때문에 가독성이 약간 떨어진다.
그러므로 SizedBox() 위젯을 사용해주자!
3. 코드 정리!
분리해서 가독성 좋게 만들었다.
children: [
  _Logo(),
  SizedBox(
    height: 30.0,
  ),
  _AppName(),
],

BoxDecoration getBoxDecoration() {
    return BoxDecoration(
        gradient: LinearGradient(
      begin: Alignment.topCenter,
      end: Alignment.bottomCenter,
      colors: [
        Color(0xFF2A3A7C),
        Color(0xFF000118),
      ],
    ));
}

class _Logo extends StatelessWidget {
  const _Logo({Key? key}) : super(key: key);

  @override
  Widget build(BuildContext context) {
    return Image(
      image: AssetImage("asset/img/logo.png"),
    );
  }
}

class _AppName extends StatelessWidget {
  const _AppName({Key? key}) : super(key: key);

  @override
  Widget build(BuildContext context) {
    // 공통적인 textStyle 변수선언
    final textStyle = TextStyle(
      color: Colors.white,
      fontSize: 30.0,
      fontWeight: FontWeight.w300,
    );

    return Row(
      mainAxisAlignment: MainAxisAlignment.center,
      children: [
        Text(
          'VIDEO',
          style: textStyle,
        ),
        Text(
          'PLAYER',
          style: textStyle.copyWith(
              fontWeight: FontWeight.w700), // 공통 스타일과 다른 부분은 copyWith() 사용
        )
      ],
    );
  }
}
끝으로...
- BoxDecoration 위젯을 사용해봤다.

'⭐️ 개발 > 플러터' 카테고리의 다른 글
| [프로젝트] 영상플레이어 (4) 동영상 위 버튼 올리기 (2) | 2022.12.15 |
|---|---|
| [이슈] - 이미지가 출력이 안될때! (0) | 2022.12.14 |
| Optional Function Paramters (2) | 2022.12.08 |
| [프로젝트] 랜덤숫자 생성 (0) | 2022.12.07 |
| [이론] const Constructor (0) | 2022.12.06 |